Portfolio and departmental competencies
Blood Gas Analyser for Point of Care Testing
Cobas b123 training for clinical medical staff only
This online learning is also compatible with mobile devices.
This e-learning course will provide an overview of the Cobas b123 blood gas analyser, and will refresh your knowledge on the following topics to ensure that you are able to obtain reliable blood gas results:
•Running sample procedures
•Troubleshooting
•Support
This training will be followed by a multiple choice online assessment – you will need to pass this to retain access (user barcode) to the analyser.

Correct Use of Point of Care Testing Devices
Before proceeding with this training course, please click on the following link and read the Correct Use of Point of Care Testing Devices statement.
By continuing with this training course you are confirming that you have read, understood and accept the Trust’s policy relating to the use of your personal Point of Care Testing barcode and the use of correct patient identification on Point of Care Testing devices.
You are also confirming that you will abide by the Point of Care Testing policy.
Introduction to the Cobas b123 System
The Cobas b 123 POC system is a multi-parameter cartridge-based blood gas analyser. The following parameters can be measured:
•Blood gases (pO2, pCO2, pH)
•Electrolytes (Sodium, Potassium, Calcium)
•Metabolites (Glucose, Lactate)
•Haemoglobin derivatives (Methaemoglobin, Carboxyhaemoglobin)
•Total haemoglobin
•Oxygen saturation
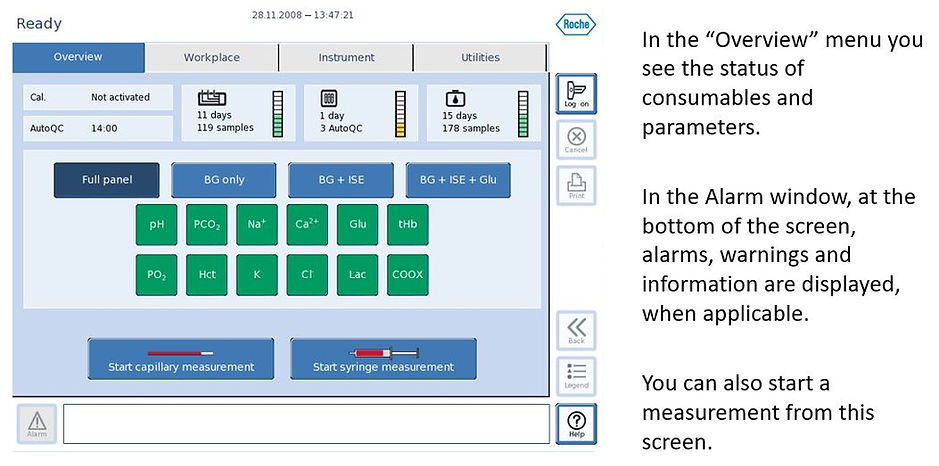
Introduction to the OVERVIEW screen


Introduction to the WORKPLACE screen

Introduction to the INSTRUMENT screen

Introduction to the UTILITIES screen

Parameters
A parameter can have different colours, depending on the status. There are 5 possible statuses:


-
Green: the parameter is activated and ready.
-
Light green: the parameter is temporarily disabled
-
Red: the parameter is not ready because it is not calibrated or remotely locked.
-
Red with ampoule: the parameter is not ready due to a QC lock.
-
Transparent: the parameter is permanently deactivated
When a parameter is not ready (red), you can see the click on the [Info] button to find out what the problem is.
Test Procedure & Results
1. Pre-analytical considerations
Transport: Syringe samples are stable at room temperature for a maximum of 15 minutes, or 30 minutes if refrigerated. Capillary samples must be analysed immediately.
Mixing: Mix the sample by rolling the syringe between the hands or gently inverting. DO NOT shake the sample as this will cause the blood cells to fracture, leading to inaccurate results.
Immediately prior to measurement the sample should be gently mixed for at least 15 seconds to ensure that there has been no settling of red blood cells

Expel the first blood drop: Always expel the first drop of blood to remove any contaminants
Sample identification: It is important to ensure that samples are clearly labelled and that the patient ID on the samples matches that on the accompanying ICE request form.
2. Operator identification
In order to use the analyser you have to press the [Log on] button and scan or type in your barcode number. Enter the same for both Operator ID and Password.

The user ID barcode issued following training is for your personal use only. It is against Trust policy to share your barcode with any other staff member.
3. Running a sample
In order to run a sample the system must be ‘Ready’. Ensure the correct parameters are selected – these can be selected/deselected manually or you can use the parameter panel buttons.
As an example, to start a capillary measurement you must press [Start capillary measurement]. Then the system is preparing the sample input for a capillary sample.

1. Introduce the capillary gently to the inlet until it is held in place and confirm on-screen by pressing the [Yes] button.

2. The system aspirates the sample and changes automatically to “Remove the capillary”. Remove the capillary and confirm on-screen by pressing the [Yes] button.
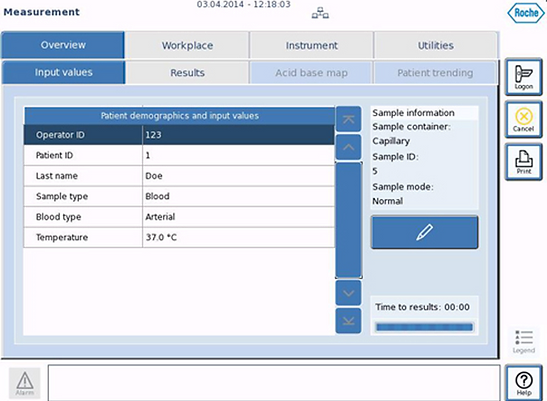
3. During the measurement you MUST enter the patients NHS or Hospital number. This ensures that the patients results are transmitted to the patients electronic record.
To do this select the ‘Patient ID’ field and scan the NHS or Hospital number from the patients notes.
Enter all other information as necessary, e.g. patients name, sample type, blood type, temperature.
If you do not enter anything into the patient ID field the analyser will not display, or print, any results.

4. When sample analysis is complete, the results screen is shown. The normal range can be found next to the patients results. Results are indicated by colour-coding and icons:
Yellow means above or below the physiological range.
Red means that the value is above or below the critical range.
Whether it is too high or too low is indicated by up or down arrows.
The results are automatically printed and stored in the measuring database.
Test Interferences
There are certain circumstances that could cause other interferences with the parameters.
Metabolites: False results can be due to metabolism of blood during the time delay between sampling and analysis. Therefore, perform metabolite measurements in heparinised whole blood in under 15 minutes or ensure sample is refrigerated for no more than 30 minutes.
Electrolytes: The potassium value of a patient can vary by up to 20% from the normal state, because of the presence of a pressure bandage. Hence, taking a blood sample while a pressure bandage is present should be avoided. It is essential to use balanced heparin anticoagulant to ensure accurate assessment of all electrolytes.
Air bubbles: The most common contaminant is air in the sample. To avoid this ensure that all air bubbles have been expelled immediately after the sample has been taken and the syringe is then capped. With capillaries ensure the sample is continuous with no air gaps, fill completely and again cap the capillary for transportation.
COOX: Measurement of the Hb derivatives by light-absorbing substances in the blood sample (e.g. contrast agent) can be disrupted. Also make sure that the sample is rolled properly to avoid sedimentation in the sample. This can affect the tHb value.
Troubleshooting
1. Alarm Colour codes
On the lower left side of the screen there is an alarm button. If a problem occurs, the colour of this alarm button will change depending on the severity of the error.


-
Transparent: No warnings or errors are present
-
Yellow: Warnings are present. You can still use the instrument but with potential limitations
-
Red: Errors are present. You cannot use the instrument or only with limitations
When the alarm button is yellow or red you can click on the button. A message window opens with the details about the warning / error and suggested resolutions. The system will show you what to do to solve the problem. If you are unsure please ring the POCT team on ext. 24118
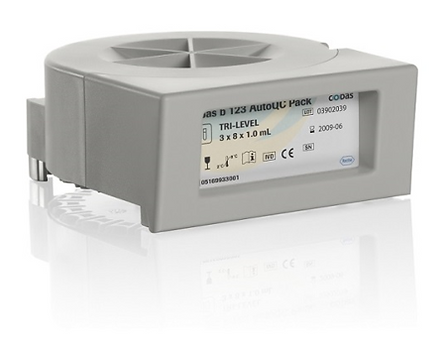
2. QC Control
To ensure the continuous quality of results, regular quality control tests should be performed. The cobas b 123 analyser has an integral automatic QC module (AutoQC) which performs up to 3 levels of QC at predetermined times.
If the instrument finds any issues with the QC test results, a flag will alert you to the problems that need fixing. Any parameter with QC problems will appear red with a picture of an ampoule. This indicates that the parameter is locked.

By clicking on the [Info] button on the ‘Overview’ screen you will see a status report of all parameters with a QC lock.
A QC lock is removed by carrying out another QC measurement whose result falls within the acceptable range.
Nursing staff on the wards have been trained to do this, with the exception of EAU. If there is a problem with a QC on the analyser in EAU please contact the POCT team on ext. 24118 , or the Biochemistry laboratory on ext. 24454, who will resolve this for you.
3. Calibration
When the analyser is in ‘Ready’ mode you can identify whether all parameters are calibrated, or if some parameters have failed calibration, from the ‘Overview’ screen.
Parameters that have failed calibration are red without any further symbols. When you press on the [Info] button, it will show you which calibration the problematic parameter has failed.

To resolve this the parameter needs to be re-calibrated.
Nursing staff on the wards have been trained to do this, with the exception of EAU. If there is a problem with a calibration on the analyser in EAU please contact the POCT team on ext. 24118 , or the Biochemistry laboratory on ext. 24454, who will resolve this for you.
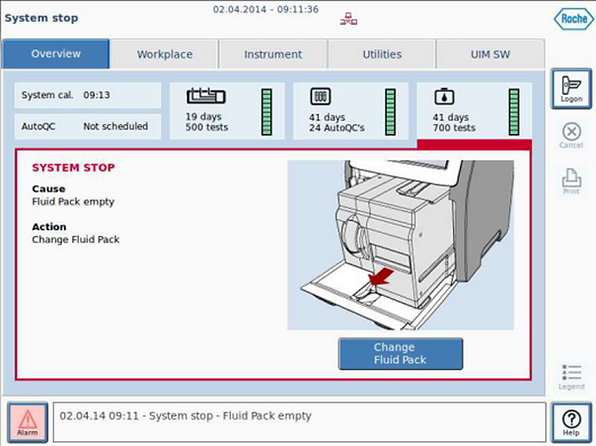
4. System stop
A system stop is a critical error which stops the instrument. You cannot perform measurements or calibrations until the issue has been resolved.
A system stop is a critical error which stops the instrument. You cannot perform measurements or calibrations until the issue has been resolved.
Nursing staff on the wards have been trained to resolve these issues, with the exception of EAU. If there is a System Stop error on the analyser in EAU please contact:
The POCT team on ext. 24118
or
The Biochemistry laboratory on ext. 24454, who will resolve this for you.
Online Assessment
Once you have passed the online assessment please enter your name and email address – your results will be sent to the POCT team.